Void with 512 megs of RAM (VM) - xbps sync causes OOMkill
Dieses Issue hat noch niemand übernommen.
Bewertung
- Schwierigkeit
- 4/5
- Geschätzter Aufwand
- 3-5 Tage
- Anfängerfreundlichkeit
- 35/100
- Issue-Typ
- Bug
- Klarheit
- Größtenteils klar
- Aktivitätsstatus
- Veraltet
- Bereich
- performance, tooling
Rechercherichtung
Start by reproducing the xbps-install calls in http/basic-void.cfg with the 512 MB and 648 MB VM limits, using void-autoinstall.pkr.hcl as the build context. Compare the 2024 ISO with the 20250202 ISO and inspect the OOM-killer output to identify what changed. Done means the installation completes reliably within 512 MB or the regression is clearly isolated.
Vom Indexierungsmodell aus dem Issue-Text verfasst.
Beschreibung
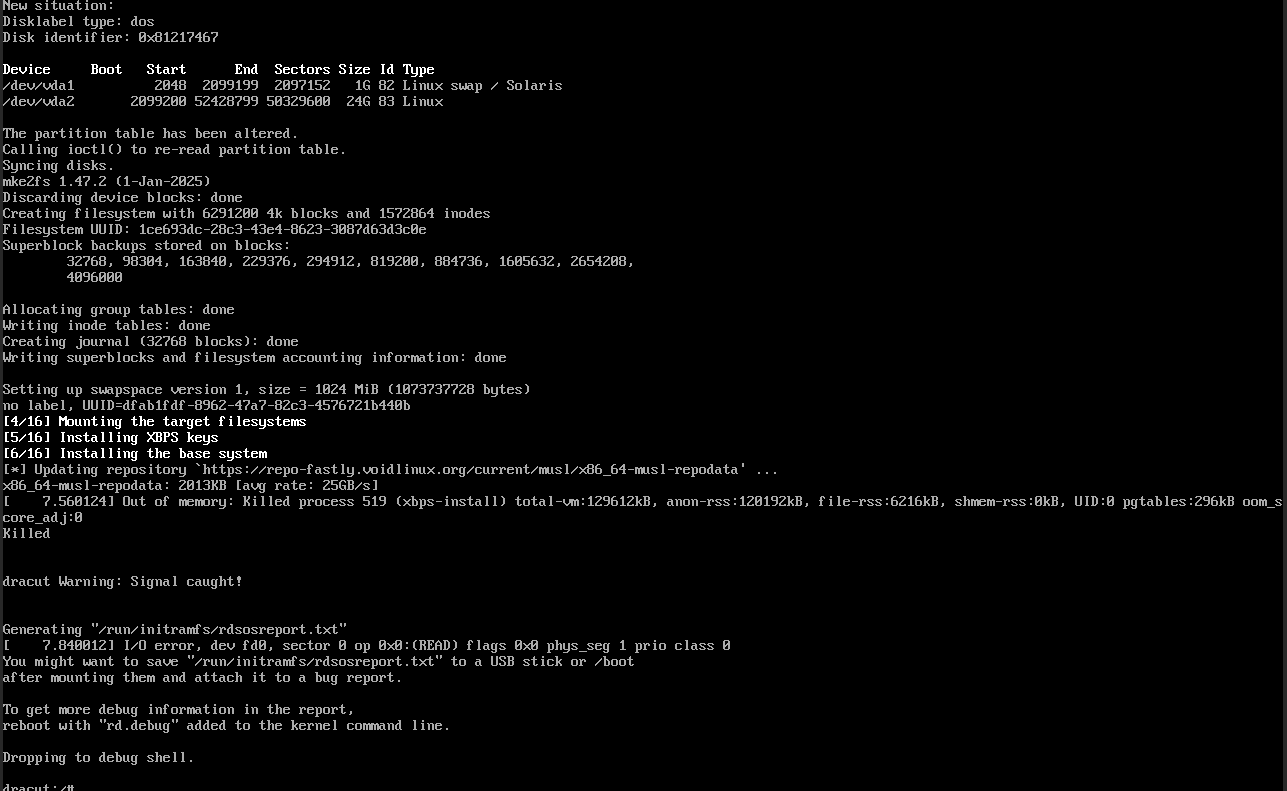
In the 2024 ISO, this wasn't a problem. Now I have a packer build as follows:
└» cat void-autoinstall.pkr.hcl
source "qemu" "void-musl" {
  iso_url          = "https://repo-fastly.voidlinux.org/live/current/void-live-x86_64-musl-20250202-base.iso"
  iso_checksum     = "sha256:0c46bf13a7a019c1fec0b2969201aecf09ff9a7646ef749e04ea63ead0c86404"
  output_directory = "output-void-musl"
  shutdown_command = "echo 'voidlinux' | sudo -S shutdown -P now"
  disk_size        = "25G"
  format           = "qcow2"
  accelerator      = "kvm"
  headless         = true
  http_directory   = "http"

  ssh_username = "admin"
  ssh_password = "voidlinux"
  ssh_timeout  = "90m" # How long we give the system to get installed

  boot_wait = "2s"
  boot_command = [
    "<tab><wait>",
    "auto autourl=http://{{.HTTPIP}}:{{.HTTPPort}}/basic-void.cfg",
    "<enter>"
  ]
}

build {
  source "source.qemu.void-musl" {
    vm_name = "void-nova"
  }
}
and the config I load:
└» cat http/basic-void.cfg
#!/bin/sh

export username=admin
export password=voidlinux

export XBPS_ARCH=x86_64-musl
export xbpsrepository="https://repo-fastly.voidlinux.org/current/musl"

export timezone="America/New_York"

export pkgs="docker git neovim temporal-cli nomad uv"

export end_action=func
end_function() {
        printf "Linking default services\n"
        ln -s /etc/sv/docker "${target}/etc/runit/runsvdir/default/docker"
        ln -s /etc/sv/dhcpcd "${target}/etc/runit/runsvdir/default/dhcpcd"
        ln -s /etc/sv/sshd "${target}/etc/runit/runsvdir/default/sshd"
        ln -s /etc/sv/agetty-ttyS0 "${target}/etc/runit/runsvdir/default/agetty-ttyS0"
        echo "***"


        echo "***"
        printf "Let's continue with our life.\n"
        sync
        reboot -f
}

# Skip boot partition
VAI_partition_disk() {
        sfdisk "${disk}" <<EOF
,${swapsize},S
;
EOF
}
VAI_format_disk() {
        mkfs.ext4 -F "${disk}2"
        mkswap -f "${disk}1"
}
export swapsize="1G"

VAI_mount_target() {
        mkdir -p "${target}"
        mount "${disk}2" "${target}"
}

VAI_configure_fstab() {
        uuid_root="$(blkid -s UUID -o value "${disk}2")"
        uuid_swap="$(blkid -s UUID -o value "${disk}1")"
        echo "UUID=$uuid_root / ext4 defaults,errors=remount-ro,noatime 0 1" >> "${target}/etc/fstab"
        echo "UUID=$uuid_swap swap swap defaults 0 0" >> "${target}/etc/fstab"
}

# Removable when this is closed
VAI_install_base_system() {
    # Install a base system
    XBPS_ARCH="${XBPS_ARCH}" xbps-install -Sy -R "${xbpsrepository}" -r /mnt base-system grub

    # Install additional packages
    if [  -n "${pkgs}" ] ; then
        # shellcheck disable=SC2086
        XBPS_ARCH="${XBPS_ARCH}" xbps-install -Sy -R "${xbpsrepository}" -r /mnt ${pkgs}
    fi
}
(yes most of this can be removed in the newest mklive but the newest mklive is newer than the ISO)
The point is this image ends up in trouble because xbps-install triggers an OOMkill reliably. I believe xbps is allocating a lot of memory where it didn't always, and the system has a 512 meg limit. If I increase the system RAM from the default (512) to 648 megs, the install works flawlessly.
- Vorherrschende Sprache
- C
- Sterne
- 1.2k
- Forks
- 156
- Ø Merge
- 1 Std. 39 Min.
- Gemergte PRs (30 T.)
- 1
Entwicklungsumgebung
- Kein Dockerfile und keine Docker-Compose-Datei
- Keine Pull-Request-Vorlage
- Beitragsleitfaden lesen
Erste Schritte
- Lesen Sie das ganze Issue und danach den Beitragsleitfaden des Projekts.
- Schreiben Sie ins Issue, dass Sie es übernehmen — das erspart doppelte Arbeit.
- Forken Sie das Repository und arbeiten Sie in einem Branch.
- Öffnen Sie einen Pull Request, der die Issue-Nummer nennt.
Mehr aus void-linux/xbps
-
Schwierigkeit 1/5 Unter einer Stunde Anfängerfreundlichkeit 68/100
void-linux/xbps#475 ·
-
Schwierigkeit 4/5 3-5 Tage Anfängerfreundlichkeit 45/100
void-linux/xbps#701 ·
-
Schwierigkeit 4/5 3-5 Tage Anfängerfreundlichkeit 55/100
void-linux/xbps#700 ·
-
xbps-query -RX repository overridesEvtl. vergeben @naevui hat das vor 57 Tagen übernommen. Offenbug
Schwierigkeit 3/5 1-2 Tage Anfängerfreundlichkeit 45/100
void-linux/xbps#696 ·
-
Schwierigkeit 3/5 1-2 Tage Anfängerfreundlichkeit 52/100
void-linux/xbps#695 · 7 Kommentare ·
Alle Issues in void-linux/xbps
Ähnliche Issues
-
Schwierigkeit 2/5 1-3 Stunden Anfängerfreundlichkeit 70/100
meshcore-dev/MeshCore#3760 · 1 Kommentar ·
Maintainer antworten meist innerhalb von 1 Tag
-
Schwierigkeit 2/5 1-3 Stunden Anfängerfreundlichkeit 68/100
ly05010419/MacNativeGames#1697 ·
Maintainer antworten meist innerhalb von 1 Tag
-
Schwierigkeit 2/5 1-3 Stunden Anfängerfreundlichkeit 70/100
colbymchenry/codegraph#3228 ·
Maintainer antworten meist innerhalb von 1 Tag
-
Schwierigkeit 2/5 1-3 Stunden Anfängerfreundlichkeit 72/100
aminya/project_options#303 ·
-
Schwierigkeit 2/5 1-3 Stunden Anfängerfreundlichkeit 90/100
Maintainer antworten meist innerhalb von 1 Tag